Saturday, August 30, 2014

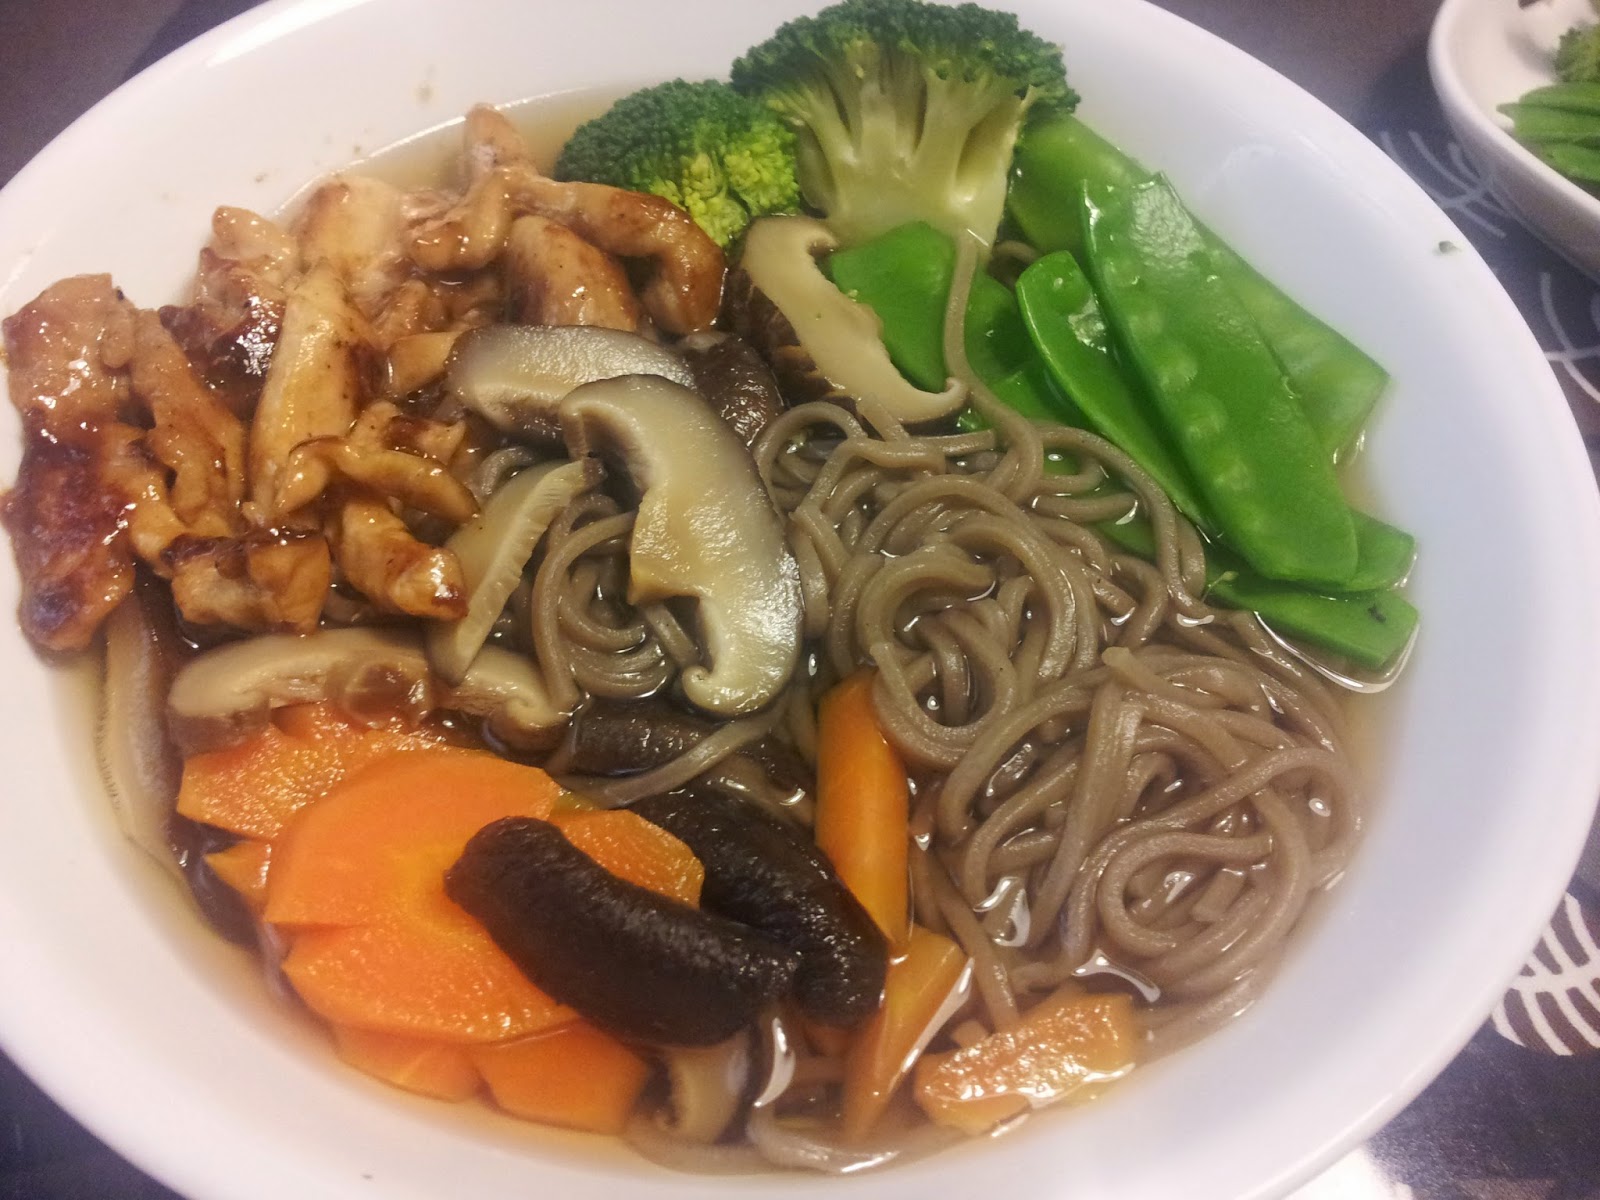
Quick and easy Soba Noodle Soup


There are  many ways of eating Soba noodle, whether it is cold , with a soup base or simply pan fried them with any ingredients you like,  absolutely up to your imagination.


We make a simple dinner some nights.  I just want to quit having too rich or meaty meals at times, this is one of the dishes I do since everyone loves Soba noodle at home.

No fuss in preparation whatsoever.  If you know how to cook instant noodles, you will know how to do this too. :)

For ingredients,  I just use what I see in the fridge and try to improvise depending on the occasion.  So be flexible with the quantity and the kind of ingredients your family would love to have it in, after all it should fit your taste.


Simple ingredients:

1.  Sliced carrots
2.  Sliced soaked mushroom
3.  Brocolli and sweet peas
4.  Sliced and stir fry chicken strips ( marinated before hand, or you may just cook some prawns and chicken strips in the soup base together).
5.  Soba noodle ( cooked al dente)
6.  Soba noodle soup base sauce  ( I got it from local Korean grocery shop)

Note: Prawns would be tasty in the soup too.


Method:

1.  Cook Soba noodle in boiling water with a little salt for 3 to 5 minutes.  Drain in running tap water. Set aside.
2.  In the pot with the soup base, quick boil all vegetables and set them aside.
3.  Pour meat in to cook ( if you are frying the meat).
4.  Add soba soup base sauce in the pot. Generally 2 tablespoons for each bowl.
5.  Add in soba noodle, turn off the heat, get servings ready for the meal !

Note: it really depends on the individual, my children actually put an extra one to 2 tablespoons of sauce into their noodle bowl.  It tasted alright, so adjust to your own taste.  It used natural ingredients without MSG, so go for it.


Pasta with Pesto


We had this last night.  It took me just a short moment to get a delicious simple meal done. One thing good about homemade ingredients is that it is indeed tasted way better than ready made Pesto sauce from store bought.


                                        Basil leaves, Pine nuts, Parmesan cheese, garlic...


                                                                     Ready to go!


                                                                         Done!


                      A very beautiful Magnolia tree I saw when I was doing my daily morning walk..


                                     Very slurpy pasta, simple and beautifully nutty with pesto...                             


Simple ingredients:

500g pasta  (I used linguine)
3 tablespoons pine nuts
2 cups  (100g) fresh basil leaves
2 cloves garlic, peeled
1/2 teaspoon salt
3 tablespoons grated Parmesan
1/2 cup olive oil  ( I used extra virgin olive oil)


Method:

1.  Cook the pasta in a large pan of rapidly boiling salt water until al dente. Drain well and return to the pan to keep warm.
2.  Meanwhile, toast pine nuts for 2 - 3 minutes or until golden brown.  Allow to cool. Process the pine nuts , basil leaves, garlic, salt and chesses in a food processor for 20 seconds, or until finely chopped.
3.  With the motor running, gradually add the oil in a thin steady stream until a paste is formed.
4.  Add ground black pepper, to taste. Toss the sauce with the warm pasta until it is well coated.
5. Enjoy!


Friday, August 29, 2014

Healthy Snowskin Mooncake ( Matcha and Rose Syrup)


                   Matcha...........    Rose syrup air bandung........MOONCAKEeeee!


I had such fun making this. I never thought I could make Mooncake so I was really excited when I saw those cute babies sitting right in front of me!  My husband and my children love my mooncake a lot!

Every year, my husband would spend a lot of money just to buy them, needless to say, mooncakes in Australia are especially pricey!  Not just that, think about the heavy sugar content, the refined oil and preservatives added into it. Hmmm..

 After he tasted some of  my homemade ones, he was convinced not to buy from stores anymore.  I saved him heaps of money.:)


 I love to follow "SiuKitchen" mooncake recipes as hers are usually healthier, less sugar, less oil yet still tasty recipes, without shortening.

 I made the split mung bean paste a day ahead, there were many different kinds of ready made paste imported from overseas. I was not really happy when I checked and found all sorts of preservatives in the paste content.
 So,  I said forget it and made it myself...
 It may be a longer process to get it done, it was well worth it.


As this was my first attempt making Mooncakes, I just wanted something classic and simple.  So I made 2 flavours, one is matcha while the other uses rose syrup "air bandung" that surprisingly I had no problems getting it here at the local Asian grocery shop.  I especially like the rose pink snowskin, it gives you such beautiful strong flavour.  Matcha does not really bring out the flavour as much hm...but green is my color!


 The following ingredients is for 50g mooncake mould ( using 30g filling, 20g pastry).  Because I owned 100g mould, therefore I doubled the ingredients ( using 70g filling, 30g pastry).


                                                   Roses Syrup and  Matcha powder

Ingredients ( Snowskin):  
1.  Milk 250 g
2.  Castor sugar  50g
3.  Condensed milk  40g
4.  Oil  10g
5.  Glutinous rice flour 70g ( not cooked type).
6.  Rice flour  50g
7.  Plain flour 20g


Method ( Snowskin):

1. Combine sugar and all sifted flours. Set aside.
2. Mix milk, condensed milk, matcha / rose syrup and oil together.
3.  Pour into the flour mixture and stir to combine.
4.  Drain through a fine sieve into a pan.
5.  Transfer to steam on high heat, 20 - 30 minutes.
6.  When steaming completed, rest the paste on cooling rack until lukewarm.
7.  Lightly quick knead so that paste just come together like a dough texture ( note: not to really knead it).
8.  Wrap dough with cling wrap and chill in fridge for late use.


Note:  one teaspoon used for matcha, one teaspoon for rose syrup "air bandung" (for 50g mould) and in the case of 100g mould, I used one tablespoon for each flavour.


Ingredients (Filling):

1.  Peeled split mung beans  160g  (wash and soaked  for 2-3 hours or, overnight).
2.  Wheat starch  10g
3.  Vegetable oil   10g
4.  Castor sugar  40g ( I used 50g)
Note: you would also need a small amount of cooked glutinous rice flour for easy moulding the mooncake.


Raw Peeled Mung Bean


Steamed and mashed


                                                                                                                                                                In smooth paste form              


Method (Filling):

1.  Add a little water to the mung beans so that it is slightly submerged.  Steam 20 to 30 minutes until softened.
2.  Mash the paste while it is still hot.  Sieve to puree if you like.
3.  Add 40g sugar into the paste and mix well.
4.  On low heat, fry the paste with the oil.
5.  Add in wheat starch when paste becoming quite dry.  Stir until all well mixed.
6.  Knead the paste until smooth when it is lukewarm.  Wrap it with cling wrap and chill in the fridge.
7.  Divide 20 g each from the" pastry" dough, 30g each from the "filling" dough.
8.  Place a pastry dough between cling film and roll it out into a thin round slice.
9.  Wrap a ball of filling with the skin, dab it into the cooked glutinous flour prepared.
10. Place it onto the mould and press gently in the corners before pushing the cake out of the mould.


                                        Happy Mooncke Festival everyone! (2014)


Thursday, August 28, 2014

Steamed Sponge Cake ( Ma Lai Go)


This is a classic cake that we always eat at the Yum Cha place, the flavour of this recipe is very similar to it,  tasted, tested and I love it ! I have been following "SiuKitchen" for some time now,  her recipes are usually healthier, with less sugar and less oil.  Just perfect for my family.


Ingredients ( for 6" mould pan):
2 eggs
20g oil
Brown sugar  80g
Evaporated milk  150g
Custard powder  10g
Corn flour  25g
Baking powder  6g
Bicarbonate of soda  4g
Self raising flour   100g


Method:
1.  Sift all flours, set aside.
2.  Whisk eggs until foamy, add sugar in batches.  Whisk until batter slightly thickened (about 5 to 8 minutes).
3.  Gradually add in evaporated milk and continue to whisk. ( change Mixer to medium speed).
4.  Fold in flours gently until no lumps.
5.  Take a small portion from the batter and mix with the oil.  This is to lighten the texture of the oil.  Pour the mixture into the batter and mix well.
6.  Pour eveything in the pan.
7.  Cover pan with cling wrap and let it rest for 30 minutes.
8.  Steam with high heat for 30 minutes.
9.  Done!


Saturday, August 23, 2014

French cheesecake


Yummy!!!!!!!!


This is my first attempt of baking a cheesecake.  It is quite an easy task.  Thanks to "Todd's Kitchen" (youtube). He is really good with Cheesecakes and ice cream recipes.  It is always simple, straight forward and yummy!

Matcha chiffon cake


There are so many variations baking chiffon cake,  this is one of the most popular one.
Matcha is my favourite, anything that is Matcha, I will sure love it.


Cantonese egg tart


My first two batches of egg tarts were a total failure until my classmate sent me this recipe, she told me it is the simplest and one of her favourite recipes.  And that I will surely succeed in only one attempt.  I was really excited and gave it a go right away.  It sure was,  thanks to Seok Ting!


But then,  sometimes saying it is easier than doing, laying the pastry onto the mould was quite tricky for a beginner like me. Also controlling the heat with the oven temperature was also another difficulty point. Anyway, I finally got it done, maybe it wasn't perfect enough but good enough for me.  I prefer this type because it doesn't use any lard ( not the flakey type) and we can have as many as we want. Moreover, it is fresh from the oven...


I always make double batches for this recipe.  You can heat it up and eat it the next day, it is good too. Of course, it is best to eat it right away when it's out from the oven.


                              Yummmm.....


Here's the recipe (" hei mama egg tart" ):

Ingredients ( for 20 tarts)

Pastry ingredients:
300g plain flour
2 tbsp custard powder
2 tbsp milk powder
1 tbsp sugar
1 egg
200g butter


Fillings ingredients:
120g sugar
350g water
5 eggs, lightly beaten
100g evaporated milk


Mehtod:
1. Dissolve sugar in the boiling water. Set aside and let it cool completely.
2. Add in whisked eggs and evaporated milk, mix well.
3. Sieve the mixture 3 times and keep them in a teapot for later use.


Methods:

1.  Melt butter.
2.  Gather all dry ingredients and mix well.
3.  Add in melted butter and whisked egg.  Mix until just good to form a soft dough.
Note:  Over kneaded dough would results dry texture.
4. Wrap the dough and rest in fridge for later use.
5. Divide into 20 dough.  Mould into tart starting from the centre moving outward and keep turning the mould as you do the job.  When pressing dough onto the tart mould, try to raise the pastry a little higher building a wall around so to enable to gather more custard that way.
6.  Pour fillings mixture into the mould tart,  just about 90% filled.
7. Bake in pre-heated oven 180 deg, 20 minutes.


3 Toned Marble bread


I was really excited and couldn't wait to start baking when  I found out I could still use the bread machine to knead the dough for a marble bread ! ( meaning a short 20 minutes and further 10 more minutes after turning the machine on and off for another).  Lalalalala... thanks so much to "Happy Home Baking"for the information and inspiration.

Steam Rice Cup Cake ( Buut Chai Go)


This was one of my favourites when I was little,  I still love it now!  I am glad that I now know how to make them. Reason, it is not easy to get them here in Australia!  Thanks to Christine's recipes, she deserves the credit!

Here's the recipe:
85g rice flour
55g wheat flour
110g brown sugar
2 cups water
Cooked sweetened red beans


Methods:
1.  Add rice flour and wheat flour into 1/2 cup of water and stir well.
2.  Dissolve sugar using the remainning 1/2 cup water on medium heat. Bring to boil.
3. Very quickly pour the sugar water into the flour mixture.
4.  Continue to stir while pouring. Stir until well combined.
4. Transfer mixture into small bowls and steam over high heat for about 20 minutes.
5. If you like,  half way of steaming, add read bean paste onto the surface of the rice cake and continue to stem until cooked through. ( Use a stick and go through into the cake and check, if it's comes out clean, it's ready to removed from the steam).

Note:  be sure to grease the little bowls before pouring batter in for steaming.
A  good gift for my neighbour during New Year..


Black glutinous Rice Chiffon Cake

I like the color of this Chiffon cake,  a deep greyish color that delivers such a beautiful aroma of coconut, soft and light texture too.
A very good recipe indeed.


Wednesday, August 20, 2014

Black glutinous rice bread


You get a beautiful color bread!

Rice bread


We often have left over rice from dinner, instead of wasting it I now used it to make bread. I replaced water to light milk and a little more honey to replace sugar.  It gives me milky beautiful strong honey flavour hence not overpowering the aroma of the rice.  It has an interesting texture as it is chewy, you just don't feel like you are eating a slice of bread but a slice of cake!
The bread is absolutely yummy, no regrets.

Thursday, August 7, 2014

Wholemeal rolls


Sometimes I shape the dough into buns so my children can have some varieties of what I've made for them, they like it that way.  I try to roll lots of seeds and grains onto the top to "trick" them to eat, that's the way I do it.

Wednesday, August 6, 2014

Korean / Japanese Soba Cold Noodle


We had a very light and simple meal of soba noodles for dinner tonight.  It is still Winter here but cold Soba noodle is still good for us.  I think, this meal would be really refreshing to have in Summertime. Anyway, my children love it so much, I saw them happily slurping all the way through dinner.


For ingredients here,
I prefer to quick fry these thin sliced beef...


                                                               Soba Noodle


Soba sauce 


I prefer Radish Kimchi to Cabbage Kimchi...


Very yummy braised  Burdock, glad I bought it!


Soba noodle is made of buckwheat, a very healthy grain.  When I was browsing at the grocery shop, I saw some "Burdock" with soya sauce.  It looked very interesting and yummy so I thought it may go well with the noodles.  I bought it home without any idea what it actually was until I googled and found out that it is actually a kind of herb plant for blood purification.  It tasted really good, I'm glad I added it in!

 I have never eaten Soba noodle even though I have had Korean food many times.  Great for lazy nights in and when you don't have a big appetite for meals.


I think it can be up to your own imagination how you would like to create the noodle,  as for me its the first time making it for the family, I just used ingredients that I thought my family may like it. Yeah, I will definitely improvise it the next time I make it again.


Ingredients ( my own way?)

1.   Soba noodle
2.   Thin sliced cucumber
3.   Radish Kimchi
4.   Spring onions ( cut into very thin slices)
5.   Burdock
6.   Soba sauce
7.   Sesame paste ( I used tahini)
8.   Shabu Shabu sliced beef


Methods:

1.   Cook noodle in boiling water with a little salt for 3 to 5 minutes until soft.
2.   Rinse and drain cold water to prevent sticking.
3.   Transfer noodle to a bowl of ice cubes to chill the noodle.  Drain well.
3.   Place ingredients on top of the noodle,  add in soba sauce and sesame paste to your taste and mix well.
4.   Enjoy!